TIPS
Everyone loves to share new tips and tricks and I love hearing them. So please when you stop in I'm all ears;)
I could add a new one everyday...time I am really short on time but I will try to post as many as I can.
*************************************
BACKING!!!
*********
PLEASE ,PLEASE PRESS!!!
I do long arm for people and there are certain things that need to be done to make sure your back looks freaking fantastic!
Any long armer needs at least 6" added to the width and length...VERY IMPORTANT!
Sew your seam at least 1/2" width. You can do this 2 ways. I put the edge of my foot at the inside edge of the selvage and make sure I am getting that 1/2" OR you can trim off the selvage and measure your 1/2" whatever is easier for you!
THEN I press that seam and OPEN UP THAT SEAM and press back and front with a very hot, steam iron!
Invest in a very good steam iron. It is worth every cent!
*******************
First tip of 2019 & FOREVER!!!
BUY A GOOD STEAM IRON!
I went to Sam's and found a Rowenta Steam Iron for $30!(sale table)
Wish I would have bought the other one!
****************
Ever have issues with getting your blocks the size the pattern calls for? Yeah me too!
Every author has a different machine which means they have different 1/4" feet!
So ladies do make a practice block with some of your stash fabric you can't believe you bought then make a throw and give it away!
I always try to mark on the pattern the stitch width, the position of the needle, how far to the left or right.
********************
Because I have Janome machines I am daily asked my opinion on these and other machines.
Please do your homework. Find a dealer that will be available for any and all questions you may have. Classes are so very important. How many one on one will be available to you without having to purchase a "kit" in that class? Bring questions you may have after playing on your machine. This is an investment make sure you research and know what you want and need in your machine and machine dealer!!!
************
Calling all Janomeites!
When a pattern calls for a "scant 1/4 inch" move your stitch width, which will move your needle to the right, to 4.8!!!
It is the PERFECT scant 1/4 inch seam!!
Ladies play with your machines to get the best 1/4". Would love for pattern designers to mention what machine they were creating on!
**********
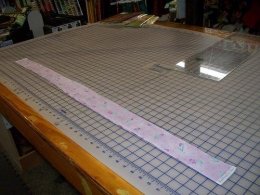
False Binding
On smaller projects sometimes binding is cumbersome.
This was a quilt as you go project. All strips, borders and my batting were pre-cut and ready to be sewn. After my strips were sewn I added my first border, yellow batik, then my second border, multi-colored batik, then my "false binding" the yellow batik.
back view
Now cut your backing the same size as your top. Place runner right side up, then place your backing right side down and sew a 1/4" seam leaving an opening to turn right-side out. Clip corners press and stitch in the ditch.
Done!
PRESS YOUR FABRIC!
Get a good iron and no it does not need to cost an arm and a leg,
Black & Decker, Sunbeam.
PRESS each seam when you are constructing your blocks and putting it all together!!!
PRESS
When piecing your backing
DO NOT
include the selvage. Use your utility foot and take a generous seam. Trim your seam to at least 1/4" then press the seam as is then PRESS OPEN!
I use STEAM!
I press, place the iron on the fabric do not stretch the fabric. When you take a quilt to be quilted or
if you are quilting your own PRESS! It does make a difference!
***************
Ladies and gentlemen after you purchase a kit make sure you can cut it out asap. There have been many quilters coming in 2,3 or more years after a kit has been purchased and due to a cutting error, theirs or the shops, they are short! Many solutions! * If you bought the quilt you love the fabric!! See if any of the fabric is available to purchase at the same time you purchase the kit. *Blenders, and I have many, can be the solution. *Everyone gives you a bag...grab a card! *ANY shop is willing to mail fabric. Smaller shops, like myself, will have fabric for a longer span of time. That's what makes us so special!!
***************
When buying fabric for ANY project always get the width of the largest piece you will need to cut then an 1/8 of a yard more.
If you wash your fabric before you cut, and if you know they rip a 1/4 yard more than the largest piece you will need to cut.
"HANG" your fabric in other words hold it up and let it hang the way IT wants to...press it that way and make sure you press the fold line.
Now you should get beautiful WOF strips and your blocks will be as straight, all the way around, as you can get them!
No more curvy cuts!!! Try it and let me know what you think!!
***************
A sure fire way to have a non-wavy border...making your quilt as square as possible!
A good friend gave me the formula and I saw it on "Fons & Porter". Lay your quilt out measure the length and width in the following manner.
With a tape measure, measure the middle and then both ends, divide it by 3 that is the length of your border.
PIN and sew!!
Now do the same for the width!!
*****************
When you are making the box bottom of any purse don't cut the triangle off as they recommend.
The bottom is more stable if you don't.
The bottom is more stable if you don't.
Tried it! I like it;)!
******************
******************
The Binding Tool
u-tube has a video on how to use your tool to bind...
This makes piecing your binding strips a bit easier!
Lay all of your strips right side up.

Lay "The Binding Tool"
on the left side of your strips as shown.

Cut off the ends as indicated on your tool.

Lay your tool on the right end of your strips as shown.

Cut off the ends as indicated on your tool.

Your strips are ready to sew!!!
Thanks Betsy!!
The Binding Tool is available to purchase!